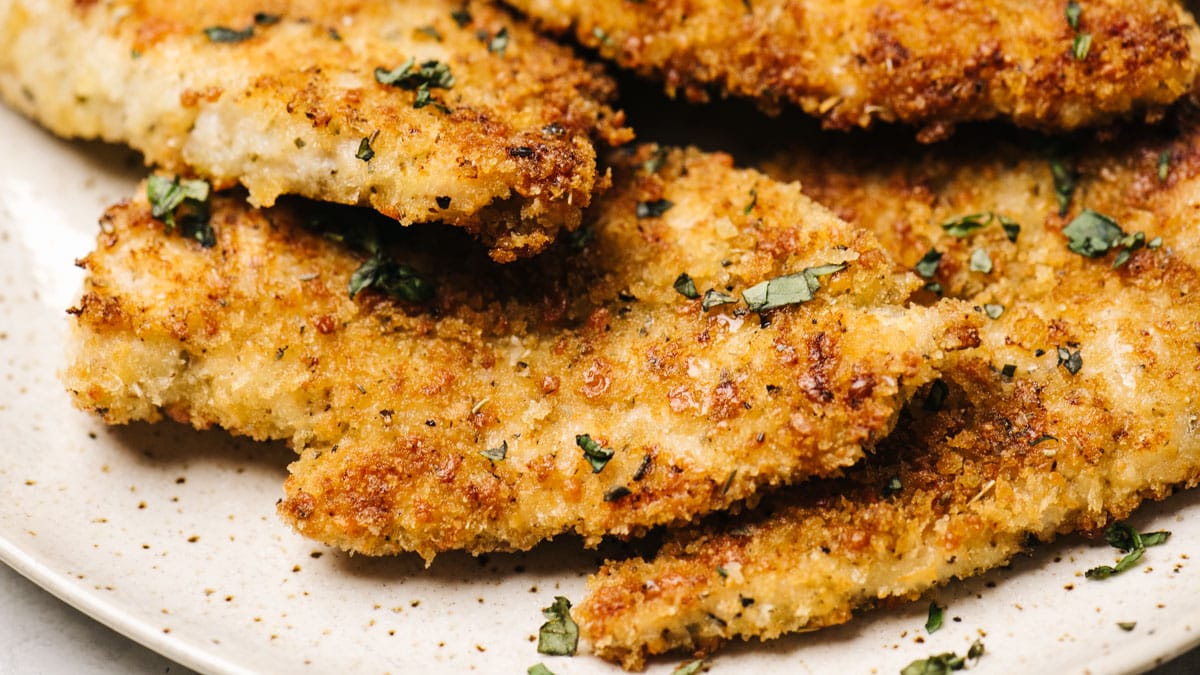
Imagine sinking your teeth into a chicken breast that's incredibly juicy on the inside, encased in a golden, shatteringly crisp, and savory parmesan crust. This isn't just a dream – it's the reality of easy baked parmesan crusted chicken, a dish that has rightfully earned its place as a weeknight hero in countless kitchens. Combining irresistible flavor with minimal effort, this recipe promises to deliver a healthy, satisfying meal that will quickly become a family favorite. Forget the fuss of deep-frying; we're achieving that perfect crispiness right in your oven or air fryer, making it the ultimate weeknight-ready solution.
Whether you're a seasoned home cook or just starting out, the appeal of a perfectly executed parmesan crusted chicken is undeniable. It's packed with flavor, remarkably versatile, and perhaps best of all, it takes mere minutes to prep. In this comprehensive guide, we'll explore the secrets to achieving that ideal balance of crispy exterior and tender interior, revealing two popular methods for crafting this culinary delight, along with expert tips to ensure flawless results every single time.
Unlocking the Perfect Parmesan Crusted Chicken: Two Proven Paths
The quest for the ultimate parmesan crusted chicken often revolves around one crucial element: the binder. This is the 'glue' that ensures your flavorful parmesan and breadcrumb coating adheres beautifully to the chicken, creating that coveted crispy crust without falling off. We'll delve into two highly effective methods, each offering unique benefits and flavor profiles.
Method 1: The Classic Olive Oil & Herb Approach
For those who appreciate simplicity and fresh, clean flavors, the olive oil and herb binder is a fantastic choice. This method lets the natural taste of the chicken, parmesan, and aromatic herbs shine through, resulting in a lighter yet equally satisfying crust. It’s a straightforward technique perfect for a quick, healthy meal.
How to Master the Olive Oil Method:
- Prepare Your Chicken: Start by patting your chicken breasts dry with paper towels. This is a critical step for a crispy crust! Season both sides generously with salt and freshly ground black pepper.
- The Wet & Dry Stations: In a shallow bowl, combine a few tablespoons of high-quality olive oil with a clove or two of finely minced garlic. In a separate shallow bowl, mix together your breadcrumbs (panko for extra crispiness!), grated Parmesan cheese, a teaspoon of garlic powder, and a teaspoon of Italian seasoning. Feel free to adjust the herb blend to your liking – a pinch of dried oregano or basil can elevate the flavor.
- Coat with Care: Dip each seasoned chicken breast fillet into the olive oil mixture, ensuring it's evenly coated but not dripping. Then, transfer it to the breadcrumb mixture, pressing firmly on both sides to create a thick, even crust. The goal is to get as much breading to stick as possible.
- Ready for Baking: Lay the coated chicken breasts on a baking sheet lined with parchment paper. Parchment paper is your friend here, preventing sticking and aiding in even browning. Repeat this process for all your chicken pieces.
Baking this version at 400°F (200°C) typically yields a fantastic crisp without the need for excessive oil, making it a truly healthy option. The olive oil not only helps the breading stick but also contributes to the golden hue and subtle richness of the crust.
Method 2: The Game-Changing Mayo & Mustard Binder for Extra Crispy Results
If your goal is an ultra-crispy, shatteringly delicious crust that absolutely refuses to fall off, then the mayonnaise and Dijon mustard binder is your secret weapon. This ingenious method solves common frustrations like soggy bottoms or breading detachment, delivering a reliably perfect crust every single time. It's the secret to achieving that "restaurant quality" finish in your own kitchen.
Why This Binder is a Game-Changer:
- The Power of Oil: Mayonnaise is primarily oil, which is a fantastic conductor of heat. This oil promotes incredible browning and helps the crust become exceptionally crispy in the oven.
- The Perfect Glue: The egg content in mayonnaise acts as an emulsifier and a superb adhesive, ensuring the breading clings tightly to the chicken throughout the cooking process.
- Flavor & Moisture Lock: Dijon mustard adds a subtle, tangy complexity that cuts through the richness of the parmesan and mayonnaise. Crucially, this binder creates a seal around the chicken, locking in moisture and guaranteeing an incredibly juicy, tender interior.
How to Master the Mayo-Mustard Method:
- Prepare Your Chicken: As with the previous method, pat your chicken breasts completely dry and season with salt and pepper.
- The Secret Binder: In a shallow bowl, whisk together a few tablespoons of mayonnaise, a teaspoon of Dijon mustard, and a clove of minced garlic. This mixture might seem unconventional, but trust the process!
- The Breading Station: In another shallow bowl, combine your panko breadcrumbs, grated Parmesan cheese, and any desired seasonings (garlic powder, Italian seasoning, a pinch of paprika, etc.).
- Coat and Press: Dip each chicken breast into the mayonnaise-mustard mixture, ensuring a thin, even layer. Then, transfer it to the breadcrumb mixture, pressing firmly to coat both sides generously. The binder will ensure a fantastic adherence.
This method truly guarantees a golden, crunchy coating that sticks to the chicken without any fuss, making every bite a delight. For a deeper dive into this incredible technique and more tips for an ultimate crispy crust, be sure to check out Unlock Ultra-Crispy Parmesan Chicken: The Secret Binder.
Essential Tips for Flawless Parmesan Crusted Chicken Every Time
Beyond the binder, a few key techniques can elevate your parmesan crusted chicken from good to absolutely extraordinary. These insights address common pitfalls and ensure a perfect outcome with minimal stress.
Chicken Prep is Key: Thinning for Even Cooking
One of the most important factors for juicy chicken and a perfectly crisp crust is even cooking. If your chicken breasts are too thick, the outside can burn before the inside is cooked through, or you risk overcooking the exterior to get the interior done. The solution? Thin chicken cutlets or fillets.
- How to Thin Chicken Breasts: If you have thick chicken breasts, place one between two pieces of plastic wrap. Using the flat side of a meat mallet or a rolling pin, pound the chicken gently and evenly until it’s about ½ to ¾ inch thick. This ensures quick and uniform cooking, keeping the chicken incredibly moist.
Panko vs. Traditional Breadcrumbs: The Crispiness Factor
While regular breadcrumbs will work, panko breadcrumbs are the undisputed champion for ultimate crispiness. Their larger, flakier structure creates a lighter, airier, and significantly crunchier crust that really stands out.
- Panko Power: Always opt for panko if you want that "shatteringly crisp" texture.
- Regular Breadcrumbs: If you only have regular breadcrumbs, they'll still yield a delicious result, but the crust will be denser and less airy. You can toast them lightly before mixing with parmesan for a bit more crunch.
The Power of Parmesan: Quality Matters
The quality of your Parmesan cheese makes a noticeable difference in both flavor and texture. Freshly grated Parmesan Reggiano or Pecorino Romano will offer a far superior, sharper, and nuttier flavor compared to pre-grated varieties.
- Fresh is Best: Grate your own cheese from a block for the most authentic and robust flavor. It also melts beautifully, contributing to a cohesive, crispy crust.
Temperature Matters: Doneness and Resting
Accurate cooking temperature and allowing your chicken to rest are crucial for food safety and optimal juiciness.
- Internal Temperature: Always cook chicken until it reaches an internal temperature of 165°F (74°C) as measured with a meat thermometer at the thickest part.
- Resting is Essential: Once cooked, transfer the parmesan crusted chicken to a platter and let it rest for 5-10 minutes before slicing and serving. This allows the juices to redistribute throughout the meat, ensuring every bite is tender and moist. Skipping this step often results in dry chicken.
Air Fryer Advantage: Speed and Extra Crisp
For an even quicker meal and an almost unbelievably crispy crust, the air fryer is a fantastic alternative to oven baking. The circulating hot air creates a magnificent crunch with minimal oil.
- Air Fryer Method: Place your coated chicken in a single layer in the air fryer basket (don't overcrowd!). Cook at 375°F (190°C) for about 10 minutes, then flip and cook for another 5-7 minutes, or until cooked through and golden brown.
For more specific guidance on quick cooking times and air fryer techniques, take a look at our article, Minute Parmesan Chicken: Quick Bake & Air Fryer Tips.
Beyond the Plate: Serving Suggestions & Leftover Magic
The beauty of parmesan crusted chicken extends far beyond its initial deliciousness. It's incredibly versatile, making it easy to pair with a variety of sides and transforming into delightful leftover meals throughout the week.
Perfect Pairings for a Complete Meal:
- Classic Comfort: Serve alongside steamed green beans, roasted asparagus, creamy mashed potatoes, or a vibrant medley of roasted root vegetables.
- Italian Flair: Present it over a bed of your favorite pasta tossed with marinara sauce, or alongside a simple lemon-garlic spaghetti.
- Fresh & Light: Slice the chicken and arrange it on top of a crisp Caesar salad or a garden salad with a light vinaigrette for a satisfying and healthy lunch or dinner.
- Creative Wraps & Sandwiches: Shred the cooked chicken and use it in a warm tortilla wrap with fresh veggies and a dollop of ranch, or layer it in a toasted sub roll with extra marinara and melted mozzarella for an instant chicken parmesan sandwich.
Leftover Magic:
One of the best qualities of this dish is how well it holds up as leftovers. Store any remaining cooked chicken in an airtight container in the refrigerator for up to 3-4 days.
- Reheating Tips: To restore some of its crispiness, reheat leftover parmesan crusted chicken in a toaster oven or air fryer until warmed through. Microwaving is an option for convenience, but it may result in a softer crust.
- Repurpose & Reinvent: Leftovers are perfect for quick additions to salads, chopping for quesadillas, or even dicing and stirring into a hearty soup.
The possibilities are truly endless, making this dish not just a delicious dinner, but a foundation for multiple meals.
There you have it – the definitive guide to crafting easy, crispy, and juicy parmesan crusted chicken right in your own kitchen. Whether you opt for the classic olive oil and herb approach or embrace the game-changing mayonnaise and mustard binder, you're guaranteed a delicious outcome that will impress your family and friends. This recipe proves that healthy, flavorful, and weeknight-ready meals don't have to be complicated. So, gather your ingredients, choose your method, and get ready to enjoy a dish that's bound to become a regular fixture on your dinner rotation.
